Some quick and easy tips to become better at plank and hover exercises
The chances are you've done a hover or a plank exercise before. These moves, or variations of them, are a staple part of many exercise sessions and group fitness classes. Often billed as a core exercise, which they are, it's easy to overlook just how effective these moves are at working your whole body.
It's not just about your abs. Your legs, butt, hips, back and shoulders will all be active and working hard. Only if you do it right though...
More...
First things first - let's decide what's a plank and what's a hover
So in the world of fitness, as is the case in most professions - different people have different words for the same exercise.
The goal of a plank is to keep your body in a position that's strong, long and straight. Literally like a 'plank' of wood.
For the purposes of this post, and in my classes, I like to keep separate terms for different positions.
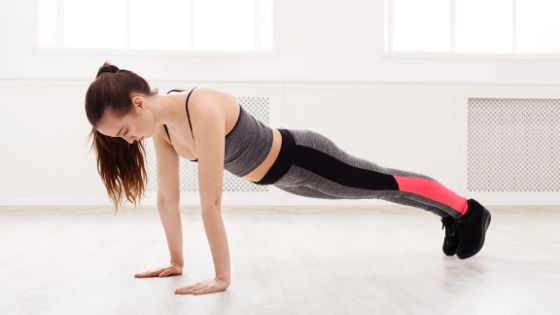
I take my definition of plank from the yoga origin, with arms outstretched and palms on the floor.

Example of plank exercise with straight arms
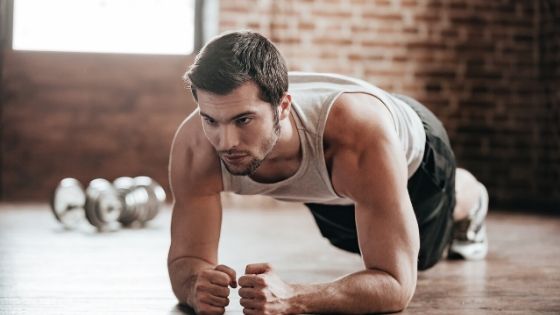
A hover requires a similar body position and requires the same long, strong and straight alignment. The difference is though that while in hover, your arms will be bent and your elbows and forearms are supporting your weight.

Example of hover exercise with arms bent and elbows on the floor
Why use a hover exercise instead of a plank?
Sometimes different exercises are chosen simply to give some variation and minimise boredom.
Other times though, there can be valid and important considerations when choosing one position over another.
It's generally regarded that the hover is a more stable position for your body. You have more surface area in contact with the floor. With your arms bent and resting on your elbows, there is less strain on your shoulder joints.
The hover also allows for a more neutral 'functional' wrist position as opposed to planks.
For these reasons, anyone with history of wrist or shoulder issues should consider using the hover exercise variation.
When it comes to adding variation and increasing intensity (see below) most people cope better starting from a hover than from plank. Try it yourself. Get on the floor in a hover then raise one leg. Keep it raised while lifting the opposite arm. Should feel tough.
Now do the same thing but starting in plank. Just got a whole lot harder not to wobble, right?!
Setting up your body position to plank properly
So the key to getting the most out of the exercise is to set up for success. Hands (or elbows if hovering) should be shoulder-width apart. You want to keep your shoulders directly above your elbows for maximum stability.
It's generally best to begin with feet wider, to give a broader base of support and therefore more stability. Hip-width to shoulder-width is ideal.
Lastly, we want to make sure our hips come to the correct position. We want them roughly the same height as your shoulders (or just a little lower). The key is maintaining a flat back and long spine.
Common faults with plank and hover exercises
A lot comes down simply to not setting up correctly in the first place (see above).
Most often, people having issues with their hovers and planks have their hips either too high or too low. If your back isn't flat, your hips need to move until it is. See if you can set up side-on next to a mirror and glance over to check your alignment. You might be surprised your hips aren't where you thought they were!
Neck alignment is a biggie too. Remember, we want to maintain a long, strong spine. Your WHOLE spine which includes your neck. The simplest way to maintain a good neck position is to point your nose straight down towards the floor. Focus your eyes on your thumbs if you're in hover, or in between your hands if you're in plank.
Making planks and hovers even tougher with exercise variations and progressions
So, once you have your basic set up correct, where to from there?
Often we'll use variations and progressions to alter the move, or change the focus on the muscles a little. We might have to lift an arm, or a leg, or both.
We might have to move our body - forward and back, side to side or even round in a circle!
Regardless, whichever method is used to vary up the move the key fundamental is still to maintain alignment.
Think 'flat back' and you won't go too far wrong.
Putting it into action in your next workout
What's the one thing you're going to takeaway and put into practise? Scroll down and leave a comment in the box and let me know. I'm interested to hear what people notice about their own technique.
When I coach 1-on-1 clients, I'll often spend 5 to 10 minutes coaching them to get their technique spot on in a hover. Universal feedback is always "Oh, that's tough!"
My response: "Yeah, you're now doing it right"
I also have a nice little drill with a broomstick I use too. Let me know if you're interested to see and hear more about that!
READ ALSO: How to do a push up properly
